Begin wrapping the copper wire around the cylindrical object 10 to 20 times leaving about 10cm (3-4″) free on each end- this will be used for the armature. Wrap the wire a few times within the coil itself to keep the arms in place – you want to make sure they are exactly 180 degrees from each other and centered as they will be supporting the weight of the coil. Strip the enamel off the arms using some scissors or something sharp – they need to be totally free of enamel.
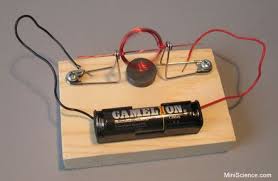
Cut two additional 10cm long pieces of wire and strip the enamel off completely – these will be the brushes and will support the armature / coil. Now wrap each one a few times around each push pin and insert into the softwood block. Create a small loop at the top of each brush for the armature to slide into. Consult the (shaky) video if my writing doesn’t make any sense.
Attach the battery to each push pin with wires – it is really handy if you can find a battery chassis with the wires already attached.
I will take some steadier photos and maybe draw up a diagram if anyone wants further instruction. All of the parts above I found at my favourite store Active Surplus for less than three dollars. Enjoy your super fun DIY motors and feel free to submit your masterpieces – I will post them in a new article.
Be Sociable, Share!
inShare
POSTED BY ASTER1SK ON THURSDAY, JUNE 17, 2010 AT 9:06 AM
FILED UNDER GEEKHUT DOT ORG, PROJECTS, THINGS TO DO · TAGGED WITH 1M, ACTIVE SURPLUS, ARMATURE COIL, BRUSHES, BUILD, C CELL, CELL BATTERY, CHASSIS, COPPER WIRE, CYLINDRICAL OBJECT, EASY, ENAMEL, FINISHING NAILS, FRIDGE MAGNETS, FUN, MAGIC MARKER, MAGNETISM, MARKER, MASTERPIECES, MOTOR, NEW ARTICLE, PROJECT, PUSH PIN, SCIENCE, SCISSORS, THIN GAUGE, THREE DOLLARS